
Flutter has quickly gained popularity as one of the best frameworks for cross-platform custom mobile app development. Whether you’re a startup aiming to develop a mobile app or an established business looking to expand your digital footprint, Flutter provides a robust solution to create apps for both iOS and Android using a single codebase.
In this step-by-step guide, we’ll walk you through the entire process of building and launching a Flutter app, from setting up your development environment to deploying your app on the Google Play Store and Apple App Store.
Why Choose Flutter for App Development?
Before diving into the technical steps, let’s discuss why Flutter has become a go-to choice for developers.
Cross-Platform Capabilities
Flutter allows you to develop apps for multiple platforms, including Android, iOS, web, and desktop, all from a single codebase. This not only saves time but also significantly reduces development costs.
Fast Development with Hot Reload
Flutter’s “Hot Reload” feature enables developers to see the results of their code changes in real-time. This speeds up the development process by allowing instant testing and iterations.
Rich UI Experience
Flutter is known for its highly customizable widgets, which enable developers to create stunning, responsive UIs that provide a native-like experience across platforms.
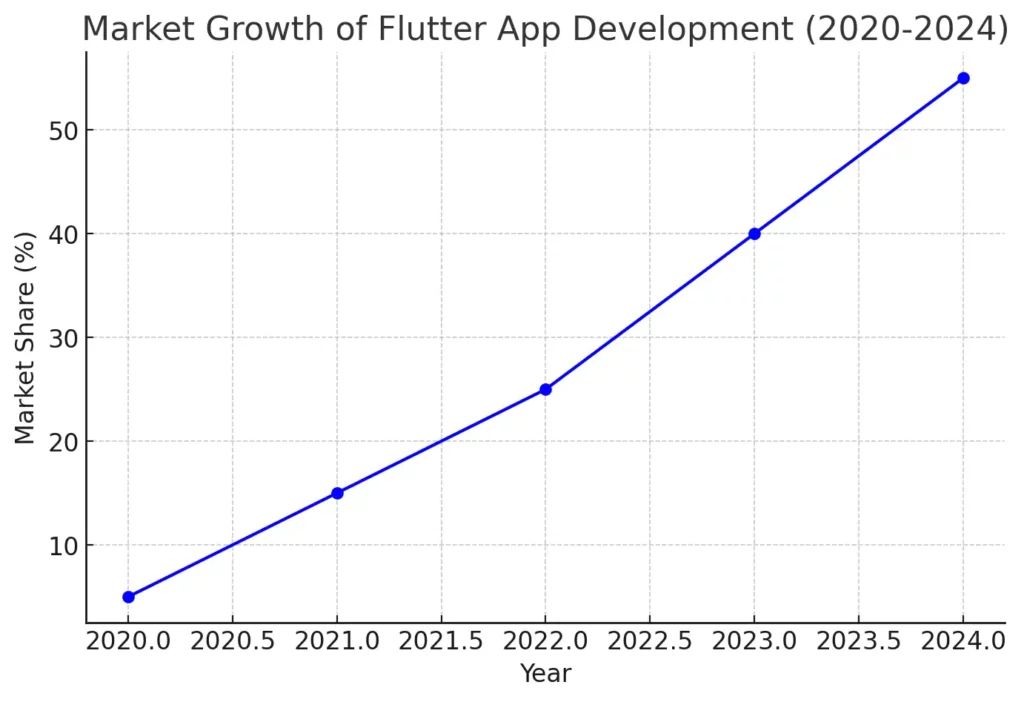
Market Trends in Flutter App Development
The demand for Flutter app development has been growing rapidly, fueled by businesses seeking cost-effective, cross-platform solutions. Several factors have contributed to Flutter’s rise in popularity, such as its strong performance, customizable UI, and seamless integration with existing systems.
Key Trends:
- Cross-Platform Development Adoption: With increasing pressure to release apps across multiple platforms (iOS, Android, Web), businesses are turning to cross-platform frameworks like Flutter. This trend is expected to grow as it enables companies to reduce development costs and time.
- Enterprise Applications: More and more enterprises are adopting Flutter for building internal tools, customer-facing applications, and B2B solutions due to its scalability and performance.
- Growing Developer Community: The Flutter developer community has expanded significantly, leading to a wider range of third-party libraries and tools that streamline development processes.
- Improved Performance: Businesses are prioritizing app performance as user expectations increase, and Flutter delivers high-quality performance similar to native apps.
- IoT and Wearable Integration: Flutter’s compatibility with Google’s Fuchsia OS and its integration with IoT and wearable devices are growing trends in the tech world.
Chart: Market Growth of Flutter from 2020 to 2024
Let me generate the chart for you based on these trends.
Best Frameworks for Cross-Platform Development
| Framework | Primary Language | Platforms Supported | Performance | Best For |
|---|---|---|---|---|
| Flutter | Dart | iOS, Android, Web, Desktop | Near-native | Apps needing high customization and performance |
| React Native | JavaScript | iOS, Android | Good, but slower than Flutter | Web developers building mobile apps |
| Xamarin | C# | iOS, Android, Windows | Native performance | Enterprise apps that require Windows support |
| Ionic | HTML, CSS, JavaScript | iOS, Android, Web | Slower than native | Web developers building hybrid apps |
| Cordova | HTML, CSS, JavaScript | iOS, Android | Slower than Ionic and Flutter | Simple apps that don’t need high performance |
If you’re considering cross-platform development, here are some of the best frameworks to choose from:
- Flutter: Flutter is Google’s UI toolkit, known for its high performance, customizable widgets, and single codebase for iOS, Android, web, and desktop apps.
- React Native: Facebook’s framework allows developers to build mobile apps using JavaScript. It’s known for its ability to create apps with a native-like feel and strong community support.
- Xamarin: Owned by Microsoft, Xamarin allows developers to build apps for iOS, Android, and Windows with a shared codebase using C#. It’s particularly strong in enterprise app development.
- Ionic: Ionic is a popular choice for web developers as it leverages web technologies (HTML, CSS, and JavaScript) to create cross-platform apps.
- Apache Cordova: This framework is a hybrid app development solution that allows developers to use web technologies to build apps. However, it’s generally less performant than Flutter or React Native.
Step 1: Setting Up Your Development Environment
To start building a Flutter app, you’ll need to set up your development environment. Here’s what you need:
- Install Flutter SDK: Download and install the Flutter SDK from flutter.dev. Follow the setup instructions for your operating system (Windows, macOS, or Linux).
- IDE Setup: Flutter supports popular IDEs like Visual Studio Code and Android Studio. Install your preferred IDE, along with the Flutter and Dart plugins for easier development.
- Configure Device or Emulator: You can either connect a physical device (iOS or Android) or set up an emulator to test your app during development.
Tip: Ensure that your system meets the minimum requirements for running Flutter and Dart. To start building a Flutter app, you’ll need to set up your development environment. Download and install the Flutter SDK from the official website and follow the setup instructions for your operating system.
Step 2: Creating Your First Flutter App
Once the environment is set up, it’s time to create your first Flutter app. Run the following command in your terminal to create a new project:
flutter create my_first_appThis will generate a Flutter app with a basic counter template. To see your app in action, navigate to the app directory and run the following command:
flutter runThis will launch the app on the connected device or emulator.
Step 3: Building the App Structure
Ready to build your Flutter app?
Discover our expert-guided process from
prototyping to launch.
Now that you have a basic app running, let’s dive into structuring the app.
1. UI Development
Flutter is known for its widget-based architecture. Start by defining your app’s UI using Flutter’s pre-built widgets like Container, Row, Column, and Text. You can also create custom widgets to suit your app’s unique design requirements.
2. State Management
Managing the app’s state is crucial for building scalable applications. Flutter provides several options for state management, including:
- setState() (for simple apps)
- Provider (recommended for medium to large apps)
- Riverpod or Bloc (for complex applications)
class MyApp extends StatefulWidget {
  @override
  _MyAppState createState() => _MyAppState();
}

class _MyAppState extends State<MyApp> {
  int _counter = 0;

  void _incrementCounter() {
    setState(() {
      _counter++;
    });
  }

  @override
  Widget build(BuildContext context) {
    return MaterialApp(
      home: Scaffold(
        appBar: AppBar(title: Text('Flutter Counter App')),
        body: Center(
          child: Column(
            mainAxisAlignment: MainAxisAlignment.center,
            children: [
              Text('You have pushed the button this many times:'),
              Text('$_counter', style: Theme.of(context).textTheme.headline4),
            ],
          ),
        ),
        floatingActionButton: FloatingActionButton(
          onPressed: _incrementCounter,
          tooltip: 'Increment',
          child: Icon(Icons.add),
        ),
      ),
    );
  }
}
Step 4: Integrating Features and Functionality
Flutter is incredibly versatile and supports integration with numerous third-party libraries for additional functionality. Here are some common features you might want to implement in your app:
- Authentication: Add user authentication using Firebase or OAuth.
- Push Notifications: Use packages like
firebase_messagingto integrate push notifications. - Database: Flutter supports both SQLite and Firebase for data storage and retrieval.
- API Integration: Use
httporDiopackages to fetch and send data from APIs.
Step 5: Testing Your Flutter App
Testing is essential to ensure the quality and functionality of your app. Flutter supports three types of testing:
- Unit Testing: For testing individual functions or classes.
- Widget Testing: To ensure that UI components render correctly.
- Integration Testing: To test the complete app’s flow.
Use the following command to run tests:
flutter testStep 6: Building and Optimizing Your App
Before launching your app, it’s crucial to build the production-ready version. This involves minifying code, optimizing the app’s size, and ensuring that it runs smoothly across devices.
Run the following command to build a release version of the app:
flutter build apk --release   # For Android
flutter build ios --release   # For iOS
Step 7: Deploying Your Flutter App
Once your app is built, it’s time to deploy it to the respective app stores.
Android Deployment
- Generate APK: Run the command
flutter build apk --releaseto generate the APK file. - Google Play Console: Create a developer account on the Google Play Console and upload your APK file.
- Review and Publish: After uploading, submit your app for review. Once approved, your app will be live on the Google Play Store.
iOS Deployment
- Create an App Store Account: Register as an Apple Developer.
- Xcode Configuration: Open your Flutter project in Xcode to configure app signing.
- App Store Connect: Upload the iOS app to App Store Connect and submit it for review.
Steps to Deploy a Flutter App on iOS and Android
Deploying your Flutter app on both iOS and Android requires a few key steps. Below is a detailed guide:
1. Android Deployment:
- Step 1: Open the project in Android Studio.
- Step 2: Navigate to the terminal and run the command:
flutter build apk --release - Step 3: Generate the APK file by running the above command. After building the APK, log in to the Google Play Console, create a new app, and upload your APK file to get it ready for publication.
- Step 4: Log in to the Google Play Console, create a new app, and upload your APK.
- Step 5: Fill in the app’s metadata (description, icon, screenshots) and submit it for review.
2. iOS Deployment:
- Step 1: Open the Flutter project in Xcode.
- Step 2: Ensure you have an Apple Developer account, then set up your app signing credentials.
- Step 3: Run the command to build an iOS release version:
flutter build ios --release - Step 4: Upload the build to App Store Connect using Xcode or the Transporter app.
- Step 5: Add all necessary app metadata, such as app name, description, and screenshots, and submit for review.
| Step | Android Deployment | iOS Deployment |
|---|---|---|
| 1 | Open the project in Android Studio | Open the project in Xcode |
| 2 | Build release APK using flutter build apk --release | Build iOS release version using flutter build ios --release |
| 3 | Generate the APK file | Set up Apple Developer credentials in Xcode |
| 4 | Upload to Google Play Console | Upload to App Store Connect via Xcode or Transporter |
| 5 | Complete app metadata (description, icon, screenshots) | Complete app metadata (description, icon, screenshots) |
| 6 | Submit for review | Submit for review |
How Much Does It Cost to Build a Flutter App?
The cost to build a Flutter app can vary significantly depending on the app’s complexity, design, features, and the geographic location of the development team. Here’s a breakdown:
| App Complexity | Estimated Cost (USD) | Time to Develop | Features |
|---|---|---|---|
| Simple App | $15,000 – $25,000 | 2 – 4 months | Basic UI, limited features, no backend |
| Medium Complexity App | $30,000 – $60,000 | 4 – 6 months | User authentication, database integration, APIs, and moderate feature set |
| Complex App | $70,000 – $150,000+ | 6 – 12 months or more | Real-time features, advanced UI/UX, third-party integrations, large-scale backend |
Factors affecting cost:
- App Features: The more advanced the features, the higher the cost.
- Backend Integration: Apps requiring complex backend systems will increase development time and cost.
- Platform Support: Developing for both iOS and Android using Flutter’s cross-platform capabilities can save money, but if you require specialized native features, costs may rise.
How Location Affects Cost: Developer Hourly Rates by Region
Developer location plays a crucial role in determining the cost of Flutter app development. Here’s a detailed look at the average hourly rates based on different regions:
| Region | Average Hourly Rate (USD) | Cost of Building a Simple Flutter App | Cost of Building a Complex Flutter App |
|---|---|---|---|
| North America (US, Canada) | $100 – $150/hour | $20,000 – $30,000 | $100,000 – $150,000 |
| Western Europe (UK, Germany) | $70 – $120/hour | $15,000 – $25,000 | $80,000 – $130,000 |
| Eastern Europe (Ukraine, Poland) | $40 – $70/hour | $10,000 – $18,000 | $50,000 – $100,000 |
| South Asia (India, Vietnam) | $20 – $40/hour | $5,000 – $12,000 | $40,000 – $80,000 |
| Latin America (Brazil, Argentina) | $30 – $50/hour | $8,000 – $15,000 | $45,000 – $85,000 |
Key Insights:
- North America: Rates are highest in the US and Canada, with top-tier development expertise but a significantly higher cost.
- Western Europe: Rates in Western Europe are slightly lower than in North America, but still on the higher end due to the strong demand for app development.
- Eastern Europe: Countries like Ukraine and Poland offer high-quality development services at lower rates
Flutter App Development Cost Calculator
Flutter App Development Cost Calculator
Estimated Development Cost: $0
Growing Importance of Flutter in the App Development Space with Statistics
Flutter has rapidly risen as one of the most popular frameworks in the app development world, revolutionizing how developers approach cross-platform projects. Here are some compelling statistics that highlight Flutter’s growing importance:
- Developer Adoption: According to a 2023 Statista report, Flutter ranks as the second most-used framework, with 42% of developers choosing it for mobile app development.
- Cross-Platform Development Preference: A 2023 StackOverflow survey revealed that 35% of businesses prefer cross-platform frameworks like Flutter over native development due to its cost-efficiency.
- App Performance: Apps built using Flutter can run 1.5x to 2x faster compared to hybrid frameworks, delivering near-native performance.
- Community Growth: Since its launch, Flutter has accumulated a strong developer community with over 143,000 stars on GitHub and numerous third-party libraries, making it a preferred choice for both startups and enterprises.
- Cost Efficiency: Flutter reduces development costs by up to 50% due to its single codebase, compared to developing separate native apps for iOS and Android.
These statistics underscore why Flutter is increasingly becoming a key choice for developers and businesses alike.
Is Flutter Better Than React Native for Startups?
When choosing between Flutter and React Native for your startup, several factors come into play. Both frameworks have their advantages, but Flutter often stands out for startups due to several reasons:
- Single Codebase for Faster MVPs: Flutter allows you to build iOS and Android apps from a single codebase, speeding up the development process—crucial for startups looking to launch quickly with a Minimum Viable Product (MVP).
- Performance: Flutter apps are compiled into native code, meaning they generally run faster compared to React Native, which relies on a JavaScript bridge for communication between the app and native modules.
- UI Flexibility: Flutter offers a wider range of customizable widgets, which can help startups design a unique and engaging UI experience without relying on platform-specific components.
- Cost-Effectiveness: Flutter’s single codebase reduces development time and costs, making it ideal for startups with limited resources.
- Community Support: While React Native has been around longer, Flutter’s rapidly growing community ensures plenty of libraries and third-party tools are available, minimizing development bottlenecks.
Overall, Flutter may be a better choice for startups focused on performance, cost efficiency, and quick turnaround.
| Feature | Flutter | React Native |
|---|---|---|
| Performance | Near-native performance (compiled into ARM code) | Good, but relies on JavaScript bridge, which may slow down performance |
| Development Speed | Fast development with hot reload, great for rapid prototyping | Also offers hot reload, but Flutter’s tooling is considered more robust |
| UI/UX | Highly customizable widgets, allowing for pixel-perfect designs | Uses native components, providing a native feel, but less flexibility in customization |
| Community & Ecosystem | Growing rapidly with extensive community and libraries | Older, with more mature community and third-party integrations |
| Learning Curve | Easier to learn for developers familiar with Dart | Easier for developers familiar with JavaScript (common in web development) |
| Popularity | Rapidly growing, especially for startups | Widely used, especially in large enterprise-level apps |
| Cost Efficiency | High cost-efficiency due to single codebase and rapid development | Also cost-efficient but may require more time for performance optimization |
| Tools & Plugins | Well-integrated tools with official support for popular IDEs like Visual Studio Code, Android Studio | More third-party plugins, though some plugins may be outdated or poorly maintained |
Flutter vs React Native: Which Should You Choose?
Many developers often compare Flutter with React Native. While both are excellent frameworks for cross-platform development, here’s a quick comparison:
- Performance: Flutter tends to offer better performance because it compiles directly to native code, whereas React Native uses a bridge to communicate with native components.
- Development Speed: Both frameworks offer fast development cycles, but Flutter’s hot reload feature is often considered more efficient.
- Community and Libraries: React Native has been around longer, which means more libraries, but Flutter’s ecosystem is catching up quickly.
Challenges Faced in Flutter App Development
While Flutter offers numerous advantages like cross-platform compatibility, fast development cycles, and a rich set of customizable widgets, there are certain challenges that developers and businesses need to be aware of. Understanding these challenges can help mitigate issues during the development process and set realistic expectations.
1. Limited Native Support for Advanced Features
- Challenge: While Flutter provides a rich set of pre-built widgets and integrations, there are still some advanced platform-specific features that Flutter doesn’t support out of the box. For example, integrating certain iOS or Android native APIs can require writing platform-specific code, adding complexity to the development process.
- Solution: Developers often need to write custom platform channels to access native features, which can extend development time and require deeper knowledge of native Android (Kotlin/Java) and iOS (Swift/Objective-C) environments.
2. App Size
- Challenge: Flutter apps tend to have larger initial sizes compared to native apps because the framework bundles the engine and necessary libraries with the app. This can result in a higher app download size, which could impact user experience, particularly for users with limited storage or slow internet connections.
- Solution: You can reduce the app size by using Flutter’s tree-shaking feature to remove unused code and optimize assets to keep the app size under control.
3. Limited Libraries for Certain Features
- Challenge: Although Flutter’s ecosystem has grown rapidly, some third-party libraries and plugins that are essential for certain functionalities may be less mature or not as feature-complete compared to those available in native development ecosystems like Android’s Jetpack or iOS’s CocoaPods.
- Solution: Developers often have to rely on building custom solutions or waiting for third-party libraries to be updated, which could delay the development timeline.
4. Complex Animations and UI Performance
- Challenge: While Flutter is excellent for creating beautiful, customizable UIs, handling complex animations and high-performance UIs can sometimes lead to performance bottlenecks. This is especially true when there are large numbers of animations or complex state management systems.
- Solution: Developers must optimize animations and performance by reducing unnecessary widget rebuilds and using Flutter’s RepaintBoundary and other performance-optimizing techniques.
5. Continuous Changes and Updates
- Challenge: Flutter is still a relatively new framework, and both Flutter and Dart are evolving. This means that developers need to constantly update their codebase to stay compatible with new releases. This can lead to version conflicts or deprecated features.
- Solution: Developers should stay updated with Flutter’s official documentation and release notes, and use version locking to ensure smooth updates.
6. iOS-Specific Challenges
- Challenge: Even though Flutter is cross-platform, iOS development with Flutter can sometimes be more challenging compared to Android. For example, integrating with specific iOS libraries or complying with App Store guidelines can add complexity.
- Solution: Developers need to have a good understanding of iOS development practices, and sometimes collaborate with iOS-native developers to handle Apple’s ecosystem-specific challenges.
7. Community Support and Documentation
- Challenge: Although Flutter’s community has grown quickly, it still doesn’t have the same level of community support as long-established platforms like Android or iOS. This means that when developers face uncommon issues, finding documentation or community-provided solutions can be more difficult.
- Solution: Engaging with the Flutter developer community through forums, GitHub, and attending Flutter-related events can help solve problems and keep pace with the latest best practices.
8. Platform-Specific Debugging
- Challenge: Debugging platform-specific issues in Flutter can be more complicated because it requires knowledge of both Flutter and native code. When issues arise in native code or platform channels, the debugging process becomes more complex.
- Solution: Using tools like Flutter DevTools, Xcode, and Android Studio can help identify and fix platform-specific issues. Developers should also be familiar with both native development environments for effective debugging.
While Flutter is an incredible tool for building cross-platform apps, it’s important to be aware of the challenges that come with it. By addressing issues related to native support, app size, performance, and platform-specific nuances early on, developers can avoid roadblocks and optimize the development process. Ensuring a solid understanding of both Flutter and native platforms will allow developers to create high-performance, scalable apps that leverage the best of Flutter’s capabilities.
Also check this article: How to Start a Concierge Business: A Complete Guide for Entrepreneurs
Common Mistakes to Avoid in Flutter App Development
Flutter’s popularity continues to grow due to its ability to create cross-platform apps efficiently. However, as with any framework, there are common mistakes that developers can make, especially when they’re new to Flutter. Avoiding these mistakes can save you time, effort, and ensure better app performance.
1. Overusing the setState() Method
- Mistake: One of the most common mistakes Flutter developers make is overusing the
setState()method, especially for handling changes in complex UIs. Overuse can lead to performance issues since it forces the entire widget tree to rebuild, even when only a small part of the UI needs updating. - Solution: Use state management solutions like Provider, Riverpod, or Bloc to manage complex state changes more efficiently. Only use
setState()for simple UI changes.
2. Ignoring Widget Rebuild Optimization
- Mistake: Developers sometimes neglect optimizing widget rebuilds, causing Flutter to re-render widgets unnecessarily, which can degrade performance, especially in complex apps with lots of interactive UI elements.
- Solution: Use
constconstructors for stateless widgets wherever possible, which will prevent unnecessary rebuilds. You can also use RepaintBoundary for sections of the UI that don’t need frequent updates.
3. Not Testing on Multiple Devices
- Mistake: Since Flutter is a cross-platform framework, one of its strengths is running on multiple platforms. However, developers often overlook testing on both iOS and Android devices. This can lead to platform-specific bugs or UI inconsistencies.
- Solution: Always test the app on multiple devices, including different screen sizes and resolutions. Use Android emulators and iOS simulators, as well as physical devices when possible, to ensure compatibility across platforms.
4. Improper Management of Assets and Resources
- Mistake: Not properly managing assets (images, fonts, icons) can cause performance issues or even crashes in the app. Some developers hard-code assets or forget to optimize them for different device resolutions.
- Solution: Use Flutter’s built-in asset management system by declaring assets in the
pubspec.yamlfile. Ensure images and other resources are properly sized and optimized for different screen densities (e.g., 1x, 2x, 3x).
5. Neglecting App Size Optimization
- Mistake: Flutter apps tend to have larger initial download sizes compared to native apps. Developers sometimes forget to optimize their app size, leading to larger-than-necessary APK or IPA files, which can be a problem for users with limited storage.
- Solution: Use tools like Flutter’s tree-shaking feature to remove unused code and assets. Also, compress images and other resources to reduce the overall app size.
6. Inconsistent Use of Widgets
- Mistake: Developers sometimes mix and match Flutter widgets inconsistently, leading to a disjointed UI. For example, using widgets from different design philosophies (like mixing Material widgets with Cupertino widgets) can confuse users, especially if the app doesn’t follow platform-specific design guidelines.
- Solution: Stick to Material Design for Android and Cupertino Design for iOS unless your app requires a custom design system. Be consistent in your use of widgets to create a cohesive UI experience.
7. Not Using Asynchronous Programming Effectively
- Mistake: Flutter relies heavily on asynchronous programming for tasks like API calls, database access, and file I/O. Some developers don’t handle asynchronous operations correctly, leading to blocking UI threads or race conditions.
- Solution: Use async/await and Futures properly to handle tasks that may take time. Ensure you’re using asynchronous functions to keep the UI responsive, especially when performing heavy tasks.
8. Skipping Error Handling
- Mistake: Skipping proper error handling in Dart and Flutter can lead to unhandled exceptions, which might crash the app or create unexpected behaviors for users.
- Solution: Implement error handling using try/catch blocks for API calls, file operations, and other areas where exceptions may occur. Additionally, using tools like Firebase Crashlytics for logging uncaught exceptions can help monitor app crashes and fix issues promptly.
9. Hardcoding Values
- Mistake: Hardcoding text, colors, dimensions, or other values directly in the widget tree is a common mistake. This leads to issues when scaling the app or adding localization.
- Solution: Define constants in a separate file or use Flutter’s ThemeData for managing styles globally. For text, use localization files so the app can be easily adapted to different languages.
10. Not Optimizing Network Requests
- Mistake: Making network requests inefficiently can lead to performance bottlenecks, especially if the app relies heavily on APIs. Some developers neglect optimizing how and when data is fetched from APIs.
- Solution: Use libraries like Dio or http to handle network requests efficiently. Consider implementing caching strategies and using pagination for large data sets to reduce the load on the API and improve app responsiveness.
Avoiding these common mistakes can greatly improve the performance, scalability, and user experience of your Flutter app. By paying attention to efficient state management, widget optimization, testing across devices, and proper error handling, developers can ensure that their app delivers the best possible results on both Android and iOS platforms.
Conclusion
Building a Flutter app is an excellent way to create a high-performance, cross-platform mobile app with minimal effort. By following the steps outlined in this guide, you’ll be well on your way to developing and launching your own Flutter app.
For businesses or entrepreneurs looking for professional assistance, Miracuves Solutions offers expert Flutter development services tailored to your needs. Contact us today to get started!
Ready to launch your Flutter app?
Our experts will guide you through every step.
FAQ
What is the cost of building a Flutter app?
The cost of building a Flutter app depends on its complexity, design, and features. Simple apps can cost between $15,000 to $25,000, while medium-complexity apps may range from $30,000 to $60,000. Highly complex apps with advanced features can cost anywhere from $70,000 to $150,000 or more. The development team’s location also significantly affects the cost.
Is Flutter better than React Native for startups?
Flutter is often considered better for startups due to its faster development cycle, near-native performance, and cost-efficiency. Flutter’s single codebase allows for rapid MVP launches, which is critical for startups. However, React Native might be preferred if a team already has JavaScript experience, though Flutter generally offers better UI customization and performance.
How does location affect the cost of Flutter app development?
The cost of Flutter app development varies greatly by region. Developers in North America typically charge between $100 to $150 per hour, while those in Eastern Europe charge between $40 to $70 per hour. In South Asia, the rates are lower, ranging from $20 to $40 per hour. This geographic difference can result in costs ranging from $10,000 to $150,000 depending on the complexity of the app.
What are the steps to deploy a Flutter app on iOS and Android?
To deploy a Flutter app on Android, you need to build the APK file using the flutter build apk --release command and then upload it to the Google Play Console. For iOS deployment, you must open the project in Xcode, build the iOS release version, and upload it to App Store Connect. Both platforms require app metadata and a review process before your app is published.
What are the main differences between Flutter and React Native?
Flutter and React Native are both popular cross-platform development frameworks, but they have key differences. Flutter offers near-native performance and customizable widgets, making it ideal for pixel-perfect designs. React Native uses native components, which provide a native-like feel, but it relies on a JavaScript bridge, which can slow down performance. Flutter also offers faster development cycles and richer UI/UX customization.
What are the best frameworks for cross-platform app development?
The best frameworks for cross-platform app development include Flutter, React Native, Xamarin, Ionic, and Cordova. Flutter and React Native are the most popular, with Flutter offering better UI customization and performance, while React Native is preferred for developers with JavaScript experience. Xamarin is excellent for enterprise apps, while Ionic and Cordova are better suited for simpler, hybrid apps.