




























Key Takeaways
- Cross-Border Payment Platform Architecture connects multi-currency accounts, international transfers, FX conversion, compliance checks, payment rails, and payouts within one financial infrastructure.
- Core architecture should coordinate user balances, beneficiaries, exchange rates, fees, transaction routing, settlement status, reconciliation, and regulatory workflows.
- Reliable cross-border payments depend on secure APIs, accurate ledger management, real-time transaction tracking, scalable infrastructure, compliance controls, and resilient payout integrations.
Architecture & Transaction Signals
- Multi-currency accounts should manage currency balances, deposits, conversions, transfers, transaction histories, exchange-rate quotes, and account-level limits accurately.
- Transfer architecture can connect banking APIs, payment processors, local payment rails, beneficiary validation, routing logic, transaction status updates, and settlement systems.
- FX services should manage reference rates, platform margins, transfer fees, quote validity, rate changes, recipient amounts, conversion records, and reconciliation across supported currencies.
Compliance & Payout Insights
- Compliance workflows should support KYC, AML screening, sanctions checks, transaction monitoring, risk scoring, transfer limits, manual reviews, audit logs, and regulatory reporting.
- Payout systems need beneficiary management, local currency settlement, payout status tracking, failed-transfer handling, refunds, reconciliation, notifications, and exception management.
- Miracuves develops customizable cross-border payment platforms with multi-currency accounts, international transfers, FX workflows, compliance controls, payment integrations, payouts, reconciliation, analytics, and admin management.
A cross-border payment platform needs a clear architecture because balances, exchange rates, transfers, compliance decisions, payout providers, and financial records cannot operate as disconnected features. Each layer depends on consistent transaction data and a reliable sequence of financial events, particularly when one transfer can involve several currencies, external providers, verification decisions, settlement steps, and operational reviews.
The architecture therefore needs to separate customer-facing experiences from the systems responsible for ledger integrity, transfer orchestration, FX calculations, risk decisions, provider communication, reconciliation, and administration. This separation makes the platform easier to extend into additional corridors while reducing the risk that changes to one integration or user interface disrupt the underlying financial records.
For founders and engineering teams, the objective is not simply to connect several financial APIs. A scalable design should preserve a reliable internal record of what happened, why it happened, which external provider was involved, which exchange rate was applied, what the transfer currently represents financially, and which operational actions were taken throughout its lifecycle.
Understand the Platform as Connected Financial Layers
A cross-border payment system becomes easier to design when the architecture is separated into clear responsibilities. The customer application handles onboarding, balances, beneficiaries, quotes, transfers, and transaction history, while backend services control identity, accounts, ledger entries, FX pricing, transfer orchestration, compliance checks, payout integrations, reconciliation, notifications, and operational administration.
These services do not necessarily need to be independent microservices from the first release. A well-structured modular application can support the same separation of responsibilities while reducing early infrastructure complexity. The important architectural decision is to prevent the user interface, external payment provider, or individual integration from becoming the source of truth for financial state.
Readers who want a product-level explanation before going deeper into system architecture can first review how cross-border payment platforms work, including multi-currency accounts, international transfers, FX conversion, recipients, and payout workflows.
Design Multi-Currency Accounts Around a Ledger, Not a Balance Field
A multi-currency account should represent financial activity through ledger entries rather than relying on a single editable balance value. Each currency balance needs to reflect the accumulated effect of credits, debits, fees, conversions, holds, releases, refunds, reversals, and administrative adjustments while retaining enough history to explain the current amount.
A common architecture separates the account or wallet from the ledger journal. The account identifies ownership and currency, while ledger entries record financial movements. Available, pending, and reserved funds can then be derived or maintained through controlled posting rules. This approach provides a clearer foundation for reconciliation because every balance change has a corresponding financial event rather than appearing as an unexplained database update.
The architecture should also preserve transaction references, timestamps, currencies, amounts, actor information, and relationships to the originating transfer or external provider. When additional currencies are introduced, the same ledger model can continue operating without redesigning the entire account system.
For a broader look at how currencies, wallets, and international payment workflows fit together at product level, Miracuves’ multi-currency payment platform guide provides useful supporting context.
Separate the FX Quote Engine From Transfer Execution
FX pricing should normally exist as its own architectural responsibility because a rate displayed to a customer is not simply a number pulled from an external API. The platform may need to combine a reference rate with corridor rules, fees, margins, quote expiry, rounding, minimum amounts, and pricing configuration before presenting the final amount.
Once the user accepts a quote, the relevant pricing information should be preserved with the transaction. Historical transfers should not change because a live rate has moved after the payment was created. Recording the applicable source amount, destination amount, applied rate, fees, margin logic, expiry time, and quote identifier gives support, finance, and compliance teams a reproducible record of the conversion.
The FX service should also be designed for provider failure. Rate sources can become slow or temporarily unavailable, which means caching, provider fallback, expiry handling, monitoring, and controlled error states matter. Miracuves’ FX API architecture guide goes deeper into the rate-feed and quote layer without requiring this article to duplicate that implementation detail.
same FX, fee, and transfer architecture also influences how the platform generates revenue. Founders evaluating transaction fees, exchange-rate margins, business accounts, and other monetization options can explore the cross-border payment business model in more detail.
Use Transfer Orchestration to Control the Transaction Lifecycle
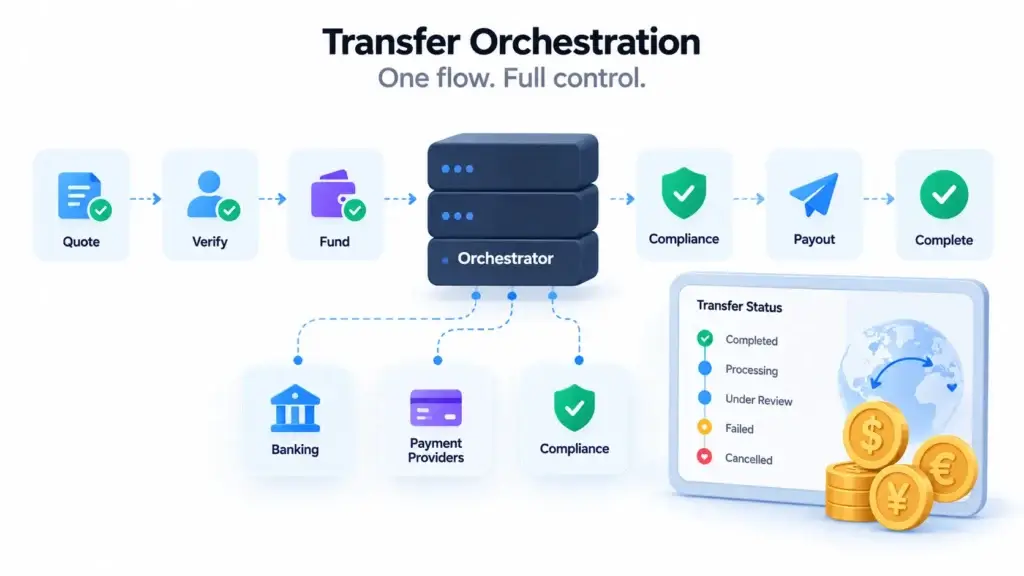
The transfer service should coordinate the complete payment journey rather than allowing each external provider to determine transaction state independently. A transfer may begin with a valid quote and verified recipient, move through funding and compliance checks, enter payout processing, and eventually become completed, failed, cancelled, reversed, or refunded. The orchestration layer provides one consistent internal model for those stages.
This architecture becomes especially important when financial events occur asynchronously. A banking or payout provider may acknowledge a request immediately but confirm completion later through a webhook. Another provider may return a temporary failure that should be retried, while a compliance decision may hold the transaction until manual review is complete. The transfer service needs to interpret those events and update the platform state according to controlled rules.
Idempotency should also be designed into money-moving operations so that retries do not accidentally create duplicate transfers or ledger postings. Each external instruction, webhook, and internal financial action should carry enough identity to determine whether it represents a new event or a repeated delivery of something already processed.
Keep Beneficiary Data Separate From Transfer Execution
Beneficiary management becomes more complex as the platform expands into new corridors because different destinations can require different account identifiers, bank-routing fields, addresses, payout methods, or supporting information. A flexible architecture should allow recipient requirements to vary by country and payout rail rather than forcing every transfer through one universal data structure.
The beneficiary service should validate the information required for the intended route before the transfer begins. This reduces avoidable payout failures and prevents the transfer orchestration layer from becoming responsible for correcting incomplete recipient records halfway through a financial workflow.
Sensitive beneficiary changes should also be auditable. When bank details, recipient names, or payout identifiers change, the platform should retain enough history to support fraud review, support investigations, and operational traceability.
Treat Compliance as a Decision Layer Across the Transaction Flow
KYC and AML should not be modeled as a single onboarding screen. Compliance decisions can influence account access, transaction limits, transfer approval, beneficiary activity, payout eligibility, and post-transaction monitoring throughout the customer relationship.
A stronger architecture separates verification status, risk profile, transaction-monitoring decisions, sanctions results, review cases, and administrative actions while allowing the transfer workflow to consult those decisions at defined checkpoints. This creates clearer boundaries between financial processing and compliance operations without treating them as unrelated systems.
The administrative layer also needs appropriate permissions so compliance analysts can review cases without receiving unrestricted control over unrelated financial settings. Audit records should preserve important decisions, changes, approvals, and escalations. Software can support these processes, but actual regulatory compliance still depends on jurisdiction, licensing, partners, policies, legal review, and the operating model.
For deeper planning around these controls, see Miracuves’ fintech compliance planning guide.
Build the Payout Layer Around Replaceable Provider Adapters
Cross-border platforms often rely on different financial partners across countries, currencies, and payout methods. Hard-coding provider-specific logic directly into the core transfer service can make future corridor expansion expensive because every new rail changes central payment logic.
A cleaner architecture uses provider adapters or connector interfaces. The transfer orchestration layer sends a normalized payout instruction, while the connector translates that request into the external provider’s required format. Responses and webhooks are then mapped back into the platform’s internal transaction model.
This approach does not remove provider-specific complexity. Different partners still have unique authentication, limits, error codes, settlement behaviour, and recipient requirements. It does, however, keep those differences at the integration boundary so the rest of the payment platform can operate using a more stable internal contract.
Design Webhooks and Retries for Financial Reliability
External payment systems frequently communicate asynchronously, which makes webhook processing part of the financial architecture rather than a secondary integration detail. Webhooks should be authenticated where supported, logged, processed idempotently, and associated with the correct transfer or provider instruction.
Temporary errors should not automatically become permanent transfer failures. Retry policies need to distinguish between transient provider problems and errors that require customer or operational intervention. Repeated failures should move into a visible exception process rather than retrying indefinitely without control.
Background queues can help separate slow provider calls, notifications, compliance checks, reporting, and reconciliation tasks from the customer request cycle. The goal is to keep the user experience responsive while maintaining enough control to know whether asynchronous work succeeded, failed, or requires investigation.
Reconciliation Should Connect Internal Records With External Money Movement
A cross-border payment platform needs to prove that its internal financial records agree with what collection, banking, FX, and payout providers report. Reconciliation closes the gap between the platform ledger and external movement of funds.
The architecture should make it possible to compare transaction identifiers, provider references, amounts, currencies, fees, payout outcomes, refunds, and settlement records. Differences should become exceptions that operations teams can investigate rather than remaining hidden in separate dashboards.
Reconciliation also influences reporting quality. Financial dashboards are more trustworthy when their figures can be traced back through ledger entries and provider records rather than calculated only from front-end transfer statuses.
Separate Settlement From Customer-Facing Transfer Status
Customer-facing transfer completion and financial settlement are related but not always identical. A payout provider may mark a beneficiary payment as completed before the operator’s own settlement relationship has fully closed, while some funding methods may settle on a different schedule.
Keeping settlement records separate from the customer transfer object allows the platform to represent both perspectives accurately. The user can see the appropriate payment status while finance teams track amounts owed, received, settled, or pending between the platform and its financial partners.
This distinction becomes increasingly important when transaction volume grows across multiple providers because treasury and finance operations need visibility beyond whether the customer-facing transfer appears successful.
Make the Admin Layer Part of the Architecture
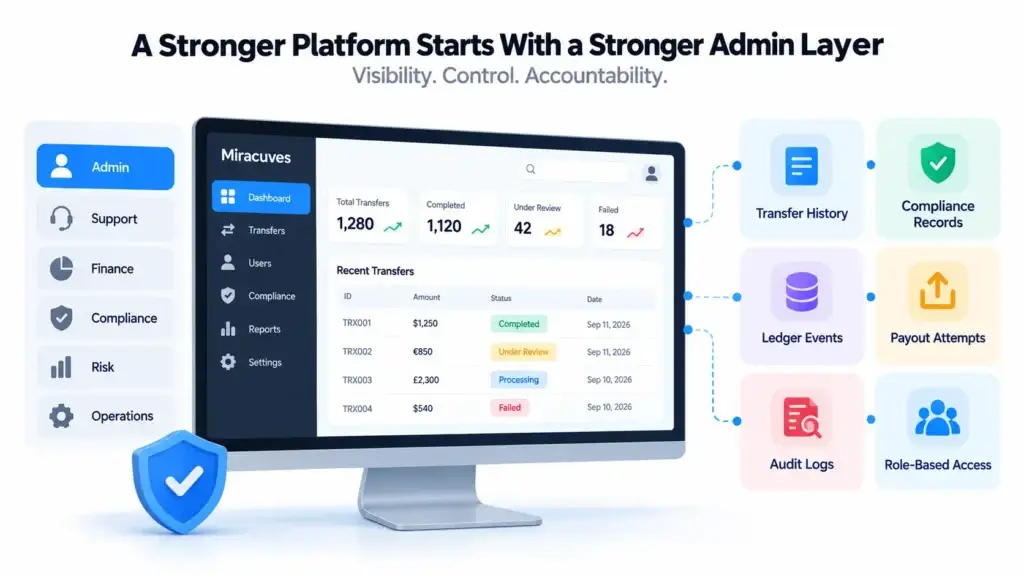
The back office is not simply another frontend. It is the operating environment through which support, finance, compliance, risk, and administrative teams investigate and control the system.
The architecture should expose relevant transfer history, ledger events, provider references, verification records, compliance decisions, payout attempts, reconciliation results, and audit history without allowing every role to modify every record. Role-based access and controlled administrative actions reduce operational risk while improving accountability.
The dedicated product layer can be explored separately through Miracuves’ cross-border payment platform features, while this architecture guide remains focused on how those capabilities should connect behind the interface.
Use Events Carefully Without Losing the Financial Source of Truth
Event-driven architecture can be useful for notifications, analytics, compliance monitoring, reconciliation jobs, reporting, and integration updates because several systems may need to react when a transfer changes state.
The ledger and transfer orchestration layers should still retain authoritative financial state. Events are useful for distributing information about changes, but rebuilding critical balances purely from loosely governed events can increase operational complexity if ordering, duplication, or missed deliveries are not handled carefully.
Teams should therefore define which records are authoritative, which events are derived, how duplicate messages are detected, and how failed consumers recover. This creates the advantages of asynchronous processing without making financial state difficult to explain.
Build Security Into Service Boundaries
Financial architecture should minimize unnecessary exposure of sensitive information. Authentication, authorization, secrets, customer data, financial-provider credentials, administrative privileges, and audit records all require explicit boundaries.
Encrypted transport, protected data storage, permission-based administrative access, credential rotation, secure API integrations, activity logs, monitoring, and controlled access to sensitive records should be part of the operating architecture. Where card or other regulated payment data is involved, responsibility should be clearly divided between the platform and appropriate payment partners.
Security controls should also support investigation. Monitoring suspicious authentication attempts, unusual administrative actions, repeated integration failures, or unexpected transaction patterns gives operations teams information they can act on rather than treating security as a passive configuration.
Design Observability Around Transactions, Not Only Servers
Traditional infrastructure monitoring answers whether an application is running. Payment operations require another level of visibility: whether financial workflows are completing correctly.
Useful observability should connect technical events to transaction context. Operations teams benefit from knowing whether a particular payout provider is failing, whether FX requests are timing out, whether a specific corridor has increased manual reviews, or whether webhook processing is delayed.
Logs, metrics, traces, provider-health indicators, queue depth, retry counts, reconciliation exceptions, and transfer-state distributions become much more useful when they help explain business operations instead of only CPU and memory consumption.
Scale the Architecture by Responsibility Before Splitting Everything Into Microservices
A fintech product does not automatically need dozens of independent services from its first release. Premature distribution can increase deployment complexity, observability requirements, network failure modes, and engineering overhead before transaction volume justifies them.
A modular architecture can initially keep accounts, FX, transfers, compliance, payouts, and reporting inside a manageable deployment while preserving strict logical boundaries. Services can later be separated where scaling, reliability, regulatory isolation, deployment cadence, or team ownership provides a clear benefit.
The most important early decision is therefore not whether the system is called a monolith or a microservice architecture. It is whether financial responsibilities are sufficiently separated that the product can evolve without rewriting the complete transaction model.
| Architecture Layer | Primary Responsibility | What It Should Not Own |
|---|---|---|
| Accounts & Ledger | Balances, holds, fees, journal entries, financial history | External payout-provider workflow |
| FX Service | Rates, quotes, margins, expiry, conversion records | Beneficiary payout execution |
| Transfer Orchestrator | Transfer state, workflow sequencing, routing, exception handling | Raw provider-specific integration logic |
| Compliance Layer | Verification state, risk decisions, monitoring, review cases | Direct manipulation of ledger balances |
| Provider Connectors | Translate internal instructions into external API calls | Define the platform-wide financial state model |
| Reconciliation | Compare internal and external financial records | Customer-facing product navigation |
| Admin & Operations | Controlled review, intervention, reporting, and investigation | Unrestricted access to every financial function |
Plan Corridor Expansion Through Configuration and Integration Boundaries
Adding a country or currency can change far more than the currency dropdown. The new route may introduce different payout partners, beneficiary requirements, transfer limits, verification rules, operating hours, liquidity requirements, pricing logic, settlement arrangements, and support procedures.
The architecture should keep those corridor-specific differences configurable where practical while allowing genuinely different financial workflows to be handled through clearly defined extensions. This prevents the platform from turning into a growing collection of conditional statements spread across accounts, transfers, compliance, and payouts.
Miracuves’remittance platform solutions provide a broader commercial view of cross-border payment products, while this article stays focused on the architecture that supports them.
Once the required account structure, corridors, financial integrations, compliance workflows, payout providers, and operational controls are defined, founders can evaluate the factors influencing cross-border payment platform development cost more accurately.
Founder Decision Signals
Ledger Integrity
If balances cannot be traced back to controlled financial entries, strengthen the ledger model before expanding transaction volume.
Provider Independence
If replacing a payout or FX provider requires rewriting core transfer logic, create clearer integration boundaries before adding more corridors.
Operational Visibility
If support or compliance teams cannot explain a failed or held transfer without engineering help, improve transaction history and back-office visibility.
Reconciliation
If internal records cannot be compared reliably with external payment and payout records, scaling transaction volume will increase financial uncertainty.
Mistakes Founders and Engineering Teams Should Avoid
Using the Displayed Wallet Balance as the Financial Record
Financial movements should be traceable through ledger entries. Updating a balance directly without preserving the underlying transaction history makes reconciliation and investigation significantly harder.
Hard-Coding One Provider Into the Transfer Engine
Banking, FX, verification, and payout partners can change as the platform expands. Clear connector boundaries reduce the amount of core financial logic that needs to be rewritten when providers change.
Allowing Webhooks to Update Financial State Without Controls
External events should be authenticated, mapped, logged, and processed idempotently. Duplicate or out-of-order events should not create duplicate ledger postings or inconsistent transfer states.
Treating Compliance as a Separate Admin Feature
Verification, transaction monitoring, limits, sanctions checks, and manual reviews can affect whether money is allowed to move. These decisions need defined integration points with the transaction workflow.
Ignoring Reconciliation Until Transaction Volume Grows
Reconciliation becomes harder to retrofit once several providers and corridors are active. Internal and external transaction references should be designed for comparison from the beginning.
Splitting Into Microservices Before the Domain Boundaries Are Clear
Distributed architecture does not automatically improve a financial product. Clear responsibilities, reliable state, and controlled interfaces matter more than the number of separately deployed services.
How Miracuves Helps Turn the Architecture Into a Launch-Ready Platform
Once the money movement model, first corridors, ledger rules, FX workflow, compliance responsibilities, financial partners, and payout strategy are defined, the implementation decision becomes more practical. Teams can determine which parts genuinely require custom engineering and which established financial workflows can begin from an existing product foundation.
Miracuves provides a white-label cross-border payment platform with multi-currency workflows, transfers, administrative operations, compliance-ready controls, API integration capability, and source-code ownership. For applicable ready-made scopes, the standard solution can be deployed in six days, while licensing, financial-partner onboarding, jurisdiction-specific compliance work, and specialized integrations can extend the overall regulated launch timeline.
Founders that require a broader financial ecosystem can also explore Miracuves’ finance and investment solutions. The stronger implementation decision is to preserve control over the payment architecture while avoiding unnecessary redevelopment of established product workflows.
Final Thoughts: Build Around Financial State, Not Individual Features
A dependable cross-border payment architecture connects multi-currency accounts, ledger entries, FX quotes, transfers, compliance decisions, payout providers, reconciliation, and administration through clearly defined responsibilities. This structure gives engineering and operations teams a reliable internal model even when external providers, currencies, and corridor requirements continue to change.
The most important architecture decisions are therefore not determined by the number of services or the programming framework. They depend on where financial truth is stored, how transaction state is controlled, how provider-specific behaviour is isolated, how compliance decisions affect money movement, and how internal records are reconciled with external financial activity.
Founders that establish these boundaries early can expand the platform more deliberately. New currencies, payout rails, financial partners, and compliance requirements can then be introduced around a stable financial core instead of forcing the team to repeatedly redesign the transaction system.
For teams comparing implementation providers, selecting the right cross-border payment development partner should include evaluating source-code ownership, fintech architecture experience, financial integrations, compliance workflows, deployment responsibilities, and post-launch support.
FAQs
What are the main components of a cross-border payment platform architecture?
The core architecture typically includes identity and account services, a multi-currency ledger, an FX quote service, transfer orchestration, beneficiary management, compliance and risk workflows, payout-provider connectors, reconciliation, settlement records, administrative operations, audit logs, and monitoring.
Why should a multi-currency platform use a ledger?
A ledger provides a traceable record of credits, debits, fees, conversions, holds, releases, refunds, and reversals. This makes balances easier to audit and reconcile than directly updating a wallet balance without preserving the underlying financial events.
Why should FX quotes be stored with each transfer?
Rates change continuously. Preserving the quote, applied rate, fees, destination amount, and expiry information gives the platform a historical record of the pricing the customer accepted and supports reporting, support, and dispute investigation.
What is transfer orchestration?
Transfer orchestration is the backend logic that coordinates the transaction lifecycle across funding, compliance checks, FX conversion, payout providers, retries, exceptions, and final completion. It provides one internal state model even when several external systems participate in the transfer.
How should payout providers be integrated?
A scalable architecture can place payout providers behind connector or adapter interfaces. This keeps provider-specific authentication, payload formats, webhooks, and errors separate from the platform’s central transfer and ledger logic.
Why is reconciliation necessary?
Reconciliation compares internal financial records with banking, collection, FX, and payout-provider data. It helps operations teams identify missing, duplicated, inconsistent, or incorrectly settled transactions before those differences become larger financial problems.
Does the architecture itself make a platform compliant?
No. Architecture can support KYC, AML, sanctions screening, transaction monitoring, audit trails, role-based controls, and compliance reporting. Final regulatory obligations depend on the jurisdiction, licensing structure, financial partners, operating model, policies, legal review, and implementation.
Should a cross-border payment platform start with microservices?
Not necessarily. A modular architecture with clear boundaries can be a practical starting point. Services can be separated later when transaction volume, reliability requirements, team ownership, deployment independence, or regulatory isolation justify the additional distributed-system complexity.
Miracuves is an independent software development company. We are not affiliated with, connected to, sponsored by, or endorsed by any company or product named in this article.
Terms such as “X Clone” are used descriptively. It is how the software industry refers to building a platform with functionality comparable to a known service, and how clients search for it.
The entire design and codebase of our products is built by our own team. Our products contain no code, design, graphics, or content originating from any third-party website or applications.
All third-party names and marks referenced in this article are the property of their respective owners, referenced solely to identify the services discussed.